Previously, we talked about updating Salesforce using JavaScript from a button in a page layout. More recently, we encountered an issue regarding how to replicate this process for multiple records to perform a mass update from a list view. One option for mass updating records from a list view is through Inline Editing. You can find more information on how to use Inline Editing in a list view by reading this blog.
What about situations where we consistently need to perform mass updates with identical data? This could involve updating just one field or multiple fields, such as changing the Account type to “Customer.” While inline editing has its limitations, especially for more complex updates, there’s a solution that involves using JavaScript to mass update records directly from a list view.
Here’s how you can achieve this:
- Create a custom button using JavaScript.
- Add the button to the list view.
For the purpose of this blog, we’ll focus on a scenario where we’re mass updating the Account type to “Customer.”
- Navigate to Setup | Customize | Accounts | Buttons, Links, and Actions
- Click New Button or Link
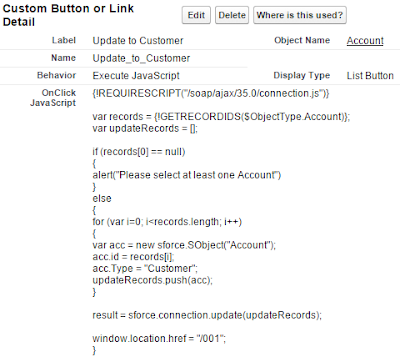
- Enter Label, select Display Type = List Button and enable Display Checkboxes (for Multi-Record Selection), Behavior = Execute JavaScript, Content Source = OnClick JavaScript
- Copy and paste following script
{!REQUIRESCRIPT("/soap/ajax/35.0/connection.js")}
 var records = {!GETRECORDIDS($ObjectType.Account)};
 var updateRecords = [];
 if (records[0] == null)
 {
  alert("Please select at least one Account")
 }
 else
 {
  for (var i=0; i<records.length; i++)
  {
   var acc = new sforce.SObject("Account");
   acc.id = records[i];
   acc.Type = "Customer";
   updateRecords.push(acc);
  }
  result = sforce.connection.update(updateRecords);
  window.location.href = "/001";
 }
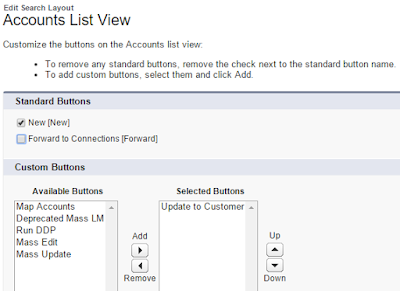
2. Add the button to list view
- Navigate to Setup | Customize | Accounts | Search Layouts
- Click Edit on Accounts List View
- Select the custom button created and move it to the right on Selected Buttons
- Save and done
Note: If a record fails to save for any reason, such as a validation rule, the error message will not be displayed, and the user may remain unaware of the issue. However, an admin can debug this using the Debug Log.

This operation will be classified as “Api” with the Application pointing to the custom button ID.