Apex Class
Here in this post, we will learn how to create a simple Apex Class?
Apex is a strongly typed Object-oriented programming language and it will run on Force.com platform.
Here we give you the info about how to create a class in salesforce.
Below is the example to create a simple class
public class MyFirstApexClass {
    // body of the Apex class. Here we can define variables and methods
}
Here is a straightforward class definition. Typically, in Salesforce, you need to use the “class” keyword followed by an access specifier to define a class. The access specifier, ‘class,’ and class names are mandatory for every class in Salesforce.
Now, let’s explore how to create a class in Salesforce.
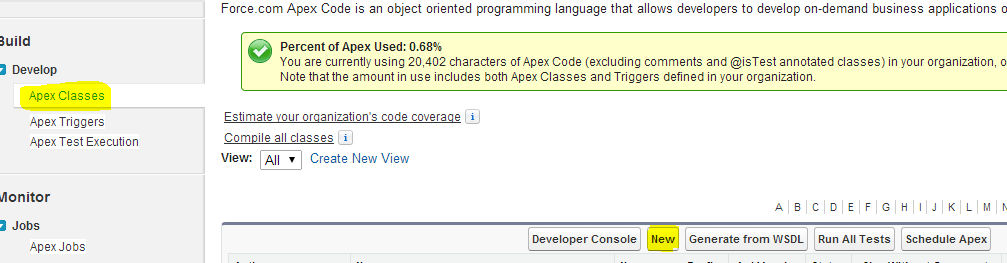
To create a class in Salesforce, navigate to Setup -> Build -> Develop -> Apex Class. Click on the NEW button and proceed to create the class there.
now we will create below call there.
public Class CreatingAccount {
	public Account createAccount(String name) { //method to create account
		Account acc = new Account();
		acc.Name = name;
		return acc;
	}
}
The class above is designed for creating/inserting a new account. This serves as a basic example of creating an Apex class. As we proceed, more examples will be covered.
Testing Class
Now, let’s provide you with an example of creating a test class.
What is a TEST class? A test class is intended to create test methods to verify whether your functionality is working correctly or not.
In Salesforce, test classes play a crucial role in deploying your code to PRODUCTION.
To deploy your classes to PRODUCTION, you must ensure at least 75% code coverage (average coverage of all classes) by incorporating test methods in Salesforce.
Here, we will elucidate how to write a test class for the aforementioned class. Further details about these test classes will be discussed later.
@isTest
public class CreateAccountTest {
	static testMethod void testInsertAccount() {
		CreatingAccount ca = new CreatingAccount();
		ca.createAccount('TestclassAcc1');
	}
}
The preceding class is a basic test class designed to encompass the code for the previously defined class.
Now, how can we determine the percentage covered by the ‘myTest’ class for my main Apex Class?
After saving your test class, you will find a button named “Run Test.” Click on that button, and your test class will execute.
To view the percentage of code coverage, navigate to your main class, where you can observe the percentage displayed under the Active column. Refer to the image below for clarification.

This is a brief example of creating a class and its corresponding test class. We will delve deeper into Apex classes and test classes later.
Alternatively, for creating Apex classes, we can use the following steps directly in the Developer Console:
- Open the Developer Console.
- Click on the “File” tab.
- The Setup Entity Type panel displays various items that can be viewed and edited in the Developer Console.
- Select “Apex Classes” and click the “New” button.
- Enter “Message” as the name of the new class and click “OK.”
- Add the following static method to the new class:
public static string
 hellowMessage () {

         return ( 'Welcome to salesforetutorial.com');

       }
- Click on “Save” button.
Example:
Public class AccountCreation {
Public Account createAccount(String name){ Account a= new Account();
a.Name = name;
insert a;
return a;
}
}
Go to the Developer console, and execute the following code
Account Creation ac = new Account Creation();
creating an instance for the above class. ac.CreateAccount('Osmania University');
calling a method
system.debug(ac);
check the account is created or not in the USER-DEBUG Log.