
Have you ever found yourself in a situation where you had to parse XML or CSV files in Apex? I’ve been there too, and we both know how challenging that can be!
Well, guess what? Dataweave in Apex will be available in beta during Spring ’23. The best part? You’ll be able to experiment with it in your org (Enterprise, Performance, Unlimited, and Developer editions) at no additional cost!
But that’s not all…
What exactly is DataWeave?
To put it in simple terms, DataWeave is a programming language specifically crafted for data transformation, which involves converting data from one format to another. For instance, it can handle conversions like CSV to JSON or XML to JSON. You can delve deeper into DataWeave by exploring more about it here. Once you grasp the fundamentals, it becomes an enjoyable and straightforward language to work with.
With DataWeave (DW), you can perform data transformations with remarkable ease, even for tasks that might appear quite intricate in Apex. Sometimes, it’s as straightforward as writing a single line of code – no joke!
Now that I have your attention…
How can I get started and dive right in?
Allow me to guide you through a brief tutorial on how to use DataWeave (DW) in Apex within your org.
Step 1: Ensure you have a Spring ’23 org. If you already have one, that’s great! If not, you can sign up for one.
Step 2: You’ll need VS Code (or you can simply use SFDX) to deploy the DW files. For this example, I’ll use VS Code because… why not!
Step 3: Create a new Project in your VS Code and authorize your Spring ’23 org.
Step 4: In the force-app\main\default directory, create a new folder named ‘dw’.
Step 5: Inside the ‘dw’ folder, create two files and name them ‘xmlToJson.dwl’ and ‘xmlToJson.dwl-meta.xml’, respectively.
Step 6: Copy the following code into the ‘xmlToJson.dwl-meta.xml’ file:
Is there anything else you’d like to know?
<?xml version="1.0" encoding="UTF-8"?>
<DataWeaveResource xmlns="http://soap.sforce.com/2006/04/metadata">
    <apiVersion>54.0</apiVersion>
</DataWeaveResource>
Step 7: Next, we’ll write some DataWeave (DW) code in the ‘xmlToJson.dwl’ file.
This script is designed to transform XML data into a JSON array.
%dw 2.0

/* Here you can define your inputs and output here. */

input data application/xml      // 'data' here acts as a variable that will be holding the incoming data.
output application/json
---

/* Write your script here */

{
    "contacts" : (
        data.contacts.*contact map {
            "FirstName":$.FirstName,
            "LastName": $.LastName,
            "Email": $.Email
        }
    )
}
Step 8: Proceed to deploy the ‘xmlToJson.dwl’ file to your org.
Step 9: Now, let’s explore how we can invoke this DataWeave (DW) script within Apex.
String xmlData= '<contacts> <contact> <Name>John</Name> <LastName>Doe</LastName> <Email>john@mail.com</Email> </contact> <contact> <Name>Jane</Name> <LastName>Doe</LastName> <Email>jane@mail.com</Email> </contact> </contacts>';

DataWeave.Script dwscript = DataWeave.Script.createScript('xmlToJson'); //xmlToJson is the name of DW file.
DataWeave.Result dwresult = dwscript.execute(new Map<String, Object>{
    'data' => xmlData
}); //Execute method takes in a map of input parameters.

System.debug(dwresult.getValue());
Output (Executing Anonymous Apex):
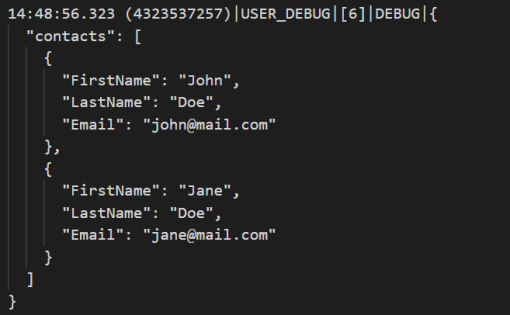
So straightforward, right?! Just imagine having to accomplish this in Apex – not quite as pleasant!
Likewise, you can convert CSV to an SObject List with just a few lines of code. DataWeave certainly brings a lot to the table!
I hope you find this information valuable! See you in the next post! And a big thank you for being an amazing reader! Don’t forget to subscribe to this blog to receive all the latest updates directly in your inbox.