By harnessing Salesforce’s Platform Events and Apex controllers, you can craft a Chatbot capable of delivering customized responses to user queries.
In this instance, we’ve crafted a Chatbot tailored to addressing customer product inquiries. Whenever a customer submits a product inquiry, a Platform Event is generated and dispatched to Salesforce. Our Lightning web component subscribes to this event and employs an Apex controller to fetch the pertinent product information. Subsequently, the Chatbot engages the customer in a conversational manner, offering the relevant product details.
Utilizing Platform Events for Chatbot Creation:
A Platform Event serves as the notification mechanism, alerting the Chatbot whenever a new product inquiry is received. Subsequently, the Chatbot can process this information and craft a response tailored to the specific inquiry. This approach enables real-time interactions between the user and the Chatbot, enhancing the overall experience in terms of seamlessness and efficiency.
Furthermore, the utilization of Platform Events eliminates the necessity for polling or continual monitoring for new inquiries. This results in a reduction of unnecessary resource consumption, thereby contributing to improved overall system performance.
Steps:
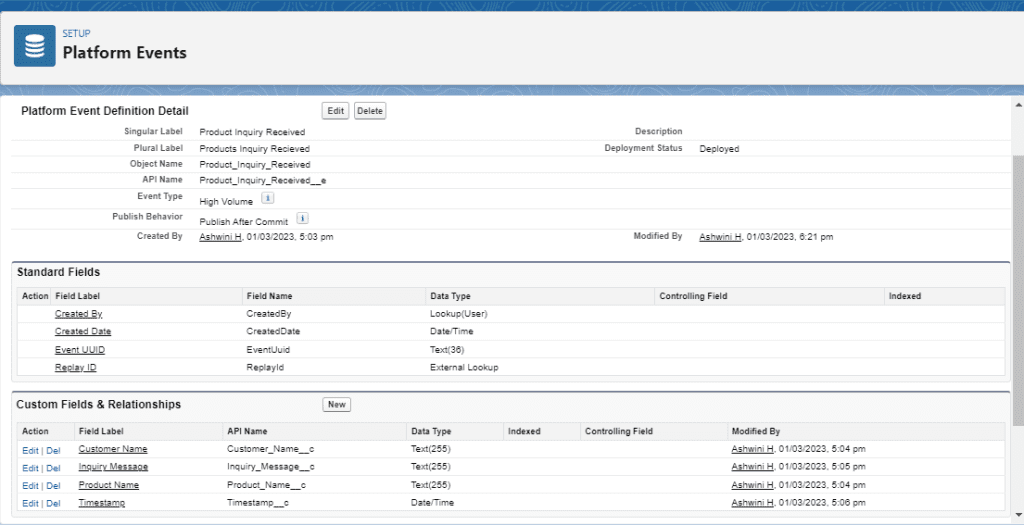
1.Creating a Platform Event:
- Navigate to Setup -> Platform Events -> New Platform Event.
- Provide the necessary details, including the Event Label, API Name, and Description. In this case, let’s name the event “Product_Inquiry_Received__e.”
- Include any additional fields you wish to add to the event, such as “Customer_Name__c,” “Product_Name__c,” “Inquiry_Message__c,” and “Timestamp__c.”
2.Establishing a Custom Object for Product Inquiries:
Please note: that this step is optional, but it can be valuable for storing and managing information associated with product inquiries.
- Navigate to Setup -> Object Manager -> Create -> Custom Object.
- Provide the necessary details, including the Object Label, Object Name, and Description. For instance, let’s name this object “Product_Inquiry__c.”
- Include any additional fields you wish to add to the object, such as “Customer_Name__c,” “Product_Name__c,” “Inquiry_Message__c,” and “Timestamp__c.”
- You also have the option to establish any essential relationships with other objects in your Salesforce org.
- Click “Save” to create the custom object.
3.Creating an Apex Trigger:
Within the Apex Trigger code, incorporate instructions to invoke the Chatbot service upon receiving the Platform Event.
trigger Product_Inquiry on Product_Inquiry__c (after insert) {
    List<Product_Inquiry_Received__e> eventList = new List<Product_Inquiry_Received__e>();
    for (Product_Inquiry__c inquiry : Trigger.new) {
        // Create a new Platform Event for each Product Inquiry record
        Product_Inquiry_Received__e event = new Product_Inquiry_Received__e();
        event.Customer_Name__c = inquiry.Customer_Name__c;
        event.Product_Name__c = inquiry.Product_Name__c;
        event.Inquiry_Message__c = inquiry.Inquiry_Message__c;
        event.Timestamp__c = System.now();
        eventList.add(event);
    }
    // Publish the Platform Event
    EventBus.publish(eventList);
}
4.Establishing an Apex Controller:
The “ProductInquiryController” method is invoked in the Lightning Web Component (LWC) to retrieve product details, which are subsequently supplied to the LWC for rendering. It serves as an intermediary between the front-end LWC and the Apex backend.
public with sharing class ProductInquiryController {

    @AuraEnabled(cacheable=true)
    public static Product2 getProductDetails(String productName) {
        List<Product2> products = [SELECT Id, Name, Description, ProductCode FROM Product2 WHERE Name = :productName LIMIT 1];
        if (!products.isEmpty()) {
            return products[0];
        }
        return null;
    }

}
5.Incorporate a Lightning Web Component:
In the Lightning Web Component code, include instructions to monitor the Apex trigger and showcase the Chatbot user interface. Below is an example of such code:
import { LightningElement, track, api, wire } from 'lwc';
import { subscribe, unsubscribe } from 'lightning/empApi'; // Removed onError, setDebugFlag, and isEmpEnabled since they are not used in this component
import getProductDetails from '@salesforce/apex/ProductInquiryController.getProductDetails';
import ProductCode from '@salesforce/schema/PricebookEntry.ProductCode';
import { loadStyle } from 'lightning/platformResourceLoader';
import style from '@salesforce/resourceUrl/style';

export default class ProductInquiryChatbot extends LightningElement {
    @api recordId;
    @track message = '';
    @track messages = [];
    subscription = null;

    // Load external stylesheet
    renderedCallback() {
        Promise.all([
            loadStyle(this, style)
        ]);
    }

    // Subscribe to the Platform Event when the component is connected to the DOM
    connectedCallback() {
        const channel = '/event/Product_Inquiry_Received__e';
        this.subscription = subscribe(channel, -1, this.handleEvent.bind(this), { scope: '' });
    }

    // Unsubscribe from the Platform Event when the component is disconnected from the DOM
    disconnectedCallback() {
        unsubscribe(this.subscription, response => {
            console.log('Unsubscribed from channel ' + JSON.stringify(response));
        });
    }

    // Update the message property when the input value changes
    handleInput(event){
        this.message = event.target.value;
    }

    // Handle form submission
    handleSubmit(event) {
        event.preventDefault();
        const message = this.message.trim();
        if (message) {
            // Add the message to the messages array
            const timestamp = new Date().toLocaleString();
            this.messages.push({ text: message, timestamp: timestamp });
            this.message = '';

            // Send a response using the chatbot service
            this.sendResponse(message);
        }
    }

    // Handle the Platform Event when it is received
    handleEvent(event) {
        const message = event.data.payload.Inquiry_Message__c;
        const timestamp = event.data.payload.Timestamp__c;
        this.messages.push({ text: message, timestamp: timestamp });
        this.sendResponse(message);
    }

    // Send a response based on the user's message
    sendResponse(message) {
        const timestamp = new Date().toLocaleString();

        if(message.toLowerCase() == 'hello' || message.toLowerCase() == 'hi'){
            // Greet the user
            const response = 'Greetings, Please type the Product details you are looking for';
            this.messages.push({ text: response, timestamp: timestamp });
        } else {
            // Call the Apex method to get product details
            getProductDetails({ productName: message })
                .then(result => {
                    if (result) {
                        // Update the message with product details
                        const { Name, ProductCode, Description } = result;
                        const response = `Product Details:<br>Name: ${Name}<br>Product Code: ${ProductCode}<br>Description: ${Description}`;
                        this.messages.push({ text: response, timestamp: timestamp, className: 'product-details' });
                    }
                    else {
                        const response = `Sorry, we could not find any product with the name "${message}"`;
                        this.messages.push({ text: response, timestamp: timestamp });
                    }
                })
                .catch(error => {
                    console.error(error);
                });
        }
    }

 }

<template>
    <div>
        <h1>Welcome to the Product Inquiry Chatbot</h1>
        <ul>
            <template for:each={messages} for:item="message">
                <li key={message.timestamp}>
                    <p>{message.text}</p>
                    <p>{message.timestamp}</p>
                </li>
            </template>
        </ul>
        <form onsubmit={handleSubmit}>
            <input type="text" value={message} oninput={handleInput} />
            <button type="submit">Send</button>
        </form>
    </div>
</template>
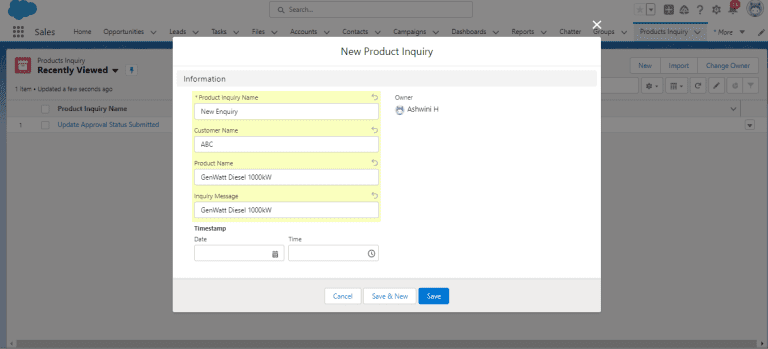
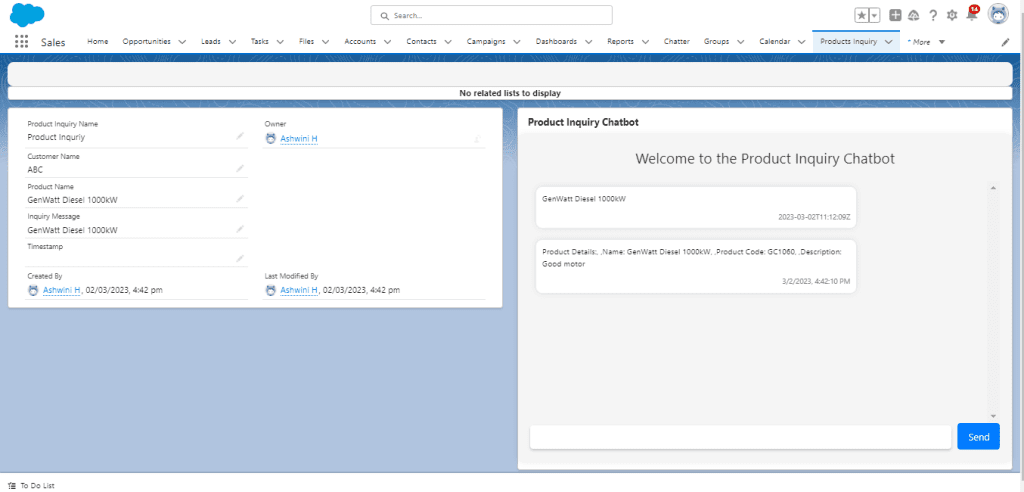
6.Present on the Frontend:
Include the Lightning Web Component on the record page. Proceed to create a new record in the Product Inquiry object and submit it. The Chatbot will manage the request and provide you with a response.