Lightning Web Components (LWC) have evolved into a vital component of the Salesforce ecosystem, empowering developers to create interactive and responsive user interfaces that enhance the overall user experience. LWC provides Salesforce administrators and developers with the ability to construct custom UI components, streamline processes, and facilitate seamless interactions within the Salesforce platform.
What sets Lightning Web Components apart is their reliance on standard web technologies like HTML, CSS, and JavaScript. This opens the doors to a broader audience of developers as there’s no need to learn a proprietary language to build components for Salesforce. Instead, you can harness your existing web development skills to create Lightning Web Components.
Let’s break down how these technologies integrate into the development process:
- HTML (HyperText Markup Language): HTML serves as the foundation for structuring your component’s content. You use HTML tags to define the layout and organize your component’s elements. In LWC, HTML forms the structural basis of your user interface, encompassing headings, lists, tables, forms, and more.
- CSS (Cascading Style Sheets): CSS is responsible for styling your Lightning Web Component. It enables you to apply styles to your HTML elements, ensuring they are visually appealing and consistent with your Salesforce organization’s branding. CSS provides control over colors, fonts, spacing, and layout.
- JavaScript: JavaScript is the core of your Lightning Web Component. It empowers you to infuse interactivity and functionality into your components. JavaScript can be used to manage user interactions, retrieve data from Salesforce or external sources, execute calculations, and dynamically update the component’s state.
Having covered this introductory aspect of LWC, let’s now dive into the hands-on part. The first step is to install the Salesforce CLI (SFDX CLI) on your system, which can be downloaded from the Salesforce CLI website. Once installed with default settings, you’ll also need to add the Salesforce CLI extension pack to your Visual Studio Code. After enabling the extension:
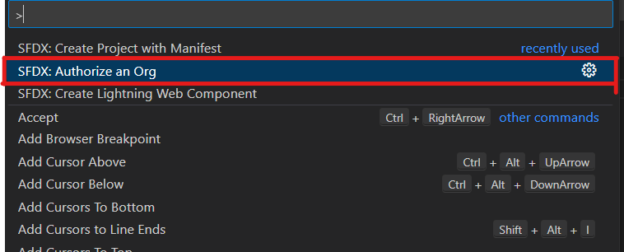
- Authorization: To connect your org, press Ctrl + P and select “Authorize my Org.” This action will redirect you to the Salesforce login page, where you’ll provide your org’s username and password. This process will seamlessly add your org to Visual Studio Code.
Developing Lightning Web Components
Once you have installed the Salesforce CLI and successfully authorized your org, the next step is to create Lightning Web Components. To do this, you can follow these steps:
- Open Visual Studio Code and press Ctrl + P.
- Select “Create Project with Manifest.” This action will result in the creation of a project.
- Inside the project, you will find various options, including LWC (Lightning Web Components), Apex Class, Triggers, and more.
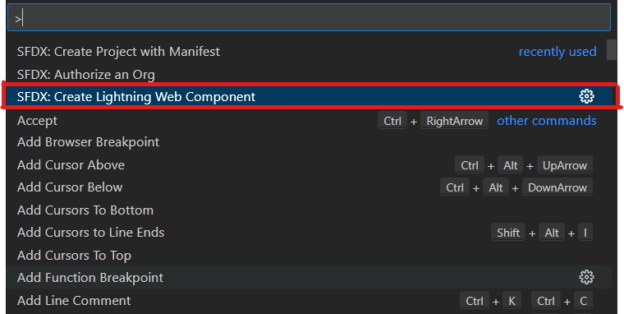
- To create a Lightning Web Component, press Ctrl + P once again and choose “Create Lightning Web Component.”
- You will then be prompted to provide a name for your new Lightning Web Component.
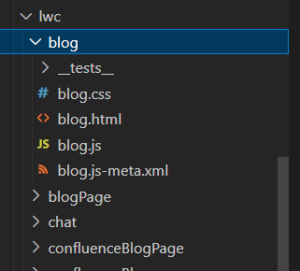
Upon creating the Lightning Web Component, you will observe the generation of three files: yourComponentName.html, yourComponentName.js, and yourComponentName.js-meta.xml.
- yourComponentName.html: In this HTML file, you define the structure and layout of your component’s user interface.
- yourComponentName.js: The JavaScript file is where you establish the logic and functionality for your component.
- yourComponentName.js-meta.xml: This XML file houses metadata information for your component, encompassing details like its API version and accessibility settings.
Edit the HTML (yourComponentName.html):
Within yourComponentName.html, you establish the framework for your component’s user interface (UI). This involves utilizing HTML tags and attributes to craft visual elements like buttons, forms, text, and more. You can make use of standard HTML, and you have the option to leverage Salesforce-specific Lightning Base Components for efficient UI development. These Lightning Base Components are pre-built and customizable, encompassing elements such as buttons, input fields, and data tables. Customize the HTML as necessary to meet your design requirements, including layout, styling, and element positioning. For styling, you can apply CSS classes or include external CSS files with the same name as your component.
To populate HTML elements dynamically with data from your Salesforce org, you can use either Lightning Data Service or JavaScript.
Implement the JavaScript Logic (yourComponentName.js):
The myComponentName.js file is where you define the logic and functionality for your LWC. Here, you manage user interactions, process data, and interact with Salesforce APIs or external services as needed. You can import JavaScript modules and libraries that are relevant to your component’s requirements. Salesforce LWC offers a comprehensive framework for handling events, state management, and server communication. To respond to user actions, such as button clicks or form submissions, you establish event handlers within the JavaScript file. Additionally, you can utilize component lifecycle hooks (e.g., connectedCallback, disconnectedCallback, renderedCallback, Navigation Mixin) to execute specific actions at various stages of the component’s lifecycle.
Customize the Metadata (yourComponentName.js-meta.xml):
The myComponentName.js-meta.xml file contains essential metadata for your component, specifying the API version, description, and other configuration settings. It’s crucial to ensure that the apiVersion aligns with the Salesforce API version in use within your org.
To make your component accessible, you need to change the IsExposed tag to “true.” Additionally, you should define the targets where your component needs to be exposed in yourComponentName-js.meta.xml.
<?xml version="1.0" encoding="UTF-8"?>
<LightningComponentBundle xmlns="http://soap.sforce.com/2006/04/metadata">
    <apiVersion>57.0</apiVersion>
    <isExposed>true</isExposed>
    <targets>
        <target>lightning__RecordPage</target>
        <target>lightning__AppPage</target>
         <target>lightning__HomePage</target>
         <target>lightningCommunity__Page</target>
    </targets>
</LightningComponentBundle>
Deploying Components to Your Organization
Once all the necessary modifications have been made to the respective files within an LWC component and all changes have been saved, the next step is to deploy these changes to your Salesforce organization. This enables you to witness the desired actions on the user interface.
Deploying an LWC component to Salesforce has been simplified, thanks to the Salesforce Extension in Visual Studio Code. This extension provides a seamless, one-click deployment process.
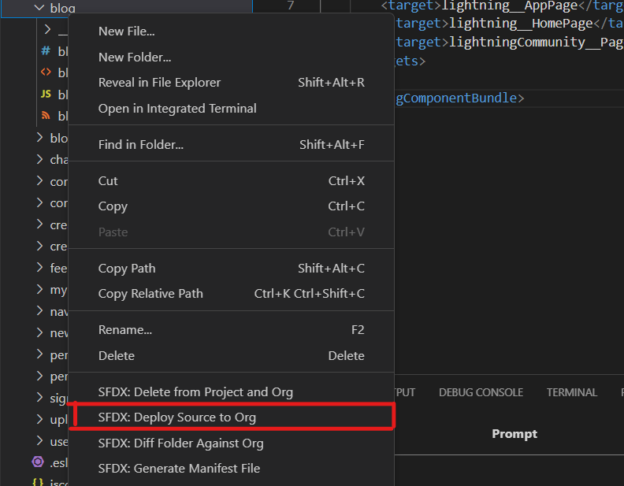
Here’s how it works: Simply right-click on the name of your component, and you’ll find the option “Deploy Source to Org.” When you select this option, the output will depend on the accuracy of your code. If everything is correct, you’ll receive a success message, indicating that your component has been successfully deployed to your organization.
To view this deployed component in action, you’ll need to visit the pages specified within the “<targets></targets>” tag in the xml.meta.js file. On these pages, you can easily drag and drop the component to integrate it into your UI.