To facilitate communication between two unrelated LWC components, the publish-subscribe mode is employed, where one component functions as a publisher and the other as a subscriber.
To transmit messages between the two components, the Lightning Message Service (LMS) is utilized.
The Lightning Message Service enables one component to publish a message to a specific channel, with other components subscribing to that channel, poised to receive and respond to the transmitted message.
Step 1: Establishing a Lightning Message Channel
To generate a Lightning Message Channel, follow these steps:
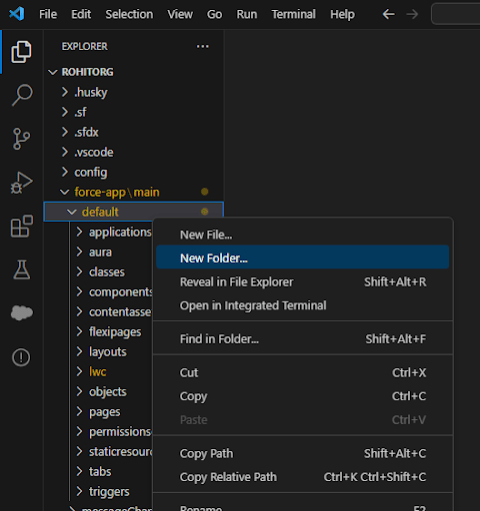
- Create a folder named “messageChannels” under the default folder, ensuring the folder name matches the specified one.
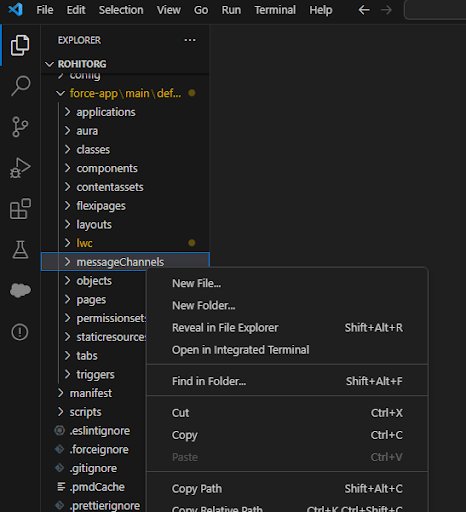
- Within the “messageChannels” folder, craft an XML file using the format “yourMessageChannelName.messageChannel-meta.xml” and assign your chosen name to the message channel.
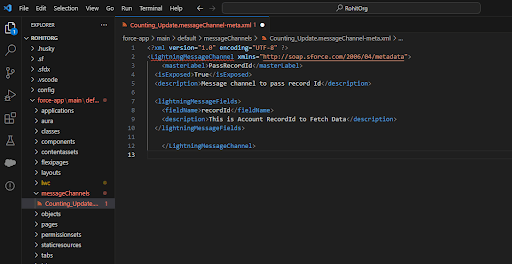
- In the XML file, set the master label as “PassRecordId” and establish lightningMessageFields, defining the parameters for sending desired values through this message channel.
- Two properties, fieldName and description, are included in our example, but additional fieldName and description properties can be added according to your needs.
Example XML file name: Counting_Update.messageChannel-meta.xml
<?xml version="1.0" encoding="UTF-8" ?>
<LightningMessageChannel xmlns="http://soap.sforce.com/2006/04/metadata">
    <masterLabel>PassRecordId</masterLabel>
  <isExposed>True</isExposed>
  <description>Message channel to pass record Id</description>

  <lightningMessageFields>
    <fieldName>recordId</fieldName>
    <description>This is Account RecordId to Fetch Data</description>
  </lightningMessageFields>

    </LightningMessageChannel>
Component Responsible for Publishing:
Step 2: Develop a Controller Class to Retrieve Account Records based on Account Name and Fetch Contacts using Account ID
APEX Controller Class:- ContactRelationController
public with sharing class ContactRelationController {

    @AuraEnabled(cacheable=true)
    public static List<Account> findAccounts(String searchKey) {
        system.debug('@this is the search key :: ' + searchKey);
        String key = '%' + searchKey + '%';
        try {
            system.debug('@this is the search key :: ' + searchKey);
            return [
                SELECT Id, Name, Phone
                FROM Account
                WHERE Name LIKE :key
                LIMIT 10
            ];
        } catch(Exception ex) {
            System.debug(ex.getMessage() + ex.getLineNumber());
            return null;
        }
    }

    @AuraEnabled(cacheable=true)
    public static List<Contact> findContacts(String accountId) {
        return [
            SELECT Id, LastName, Title, Phone, Email
            FROM Contact
            WHERE AccountId = :accountId
            LIMIT 10
        ];
    }
}
Step:3 Creating First Component to publish the Message
Html File Name – newAccConFatch.html
<template>
        <lightning-card variant="Narrow" title="Account" icon-name="standard:account">
            <lightning-input label="Account Name" type="search" value={searchKey} onchange={handleChange}></lightning-input>
            <div style="height: 300px;">
                <lightning-datatable
                    key-field="Id"
                    data={accounts}
                    columns={columns}
                    onrowaction={handleRowAction}>
                </lightning-datatable>
            </div>
        </lightning-card>
       </template>
Step:4 The javascript code to handle the changes that are made
It is necessary to import { public, MessageContext } from ‘lightning/messagingService’, providing access to a messaging channel. Following that, import the messaging channel instance as a variable recordSelectedId from ‘@salesforce/messageChannel/Counting_Update__c’.
Here, “Counting_Update__c” is the XML file name created in the “messageChannels” folder, named “Counting_Update,” and appended with “__c” to access it in the JS file.
Javascript File Name – newAccConFatch.js
import { LightningElement, track, wire } from 'lwc';
import findAccounts from '@salesforce/apex/ContactRelationController.findAccounts';
import { publish, MessageContext } from 'lightning/messageService';
import recordSelectedId from '@salesforce/messageChannel/Counting_Update__c';
//Messaging channel file name

const columns = [
    {label: 'Account Name', fieldName: 'Name', type: ‘text },
    { label: 'Id', fieldName: 'Id', type: 'text' },
    { label: 'Phone', fieldName: 'Phone', type: 'Phone' },

    },
];


export default class NewAccConFatch extends extends LightningElement {
    @track searchKey;
    @track accounts = [];
    error;
    columns = columns;

    @wire(MessageContext)
    messageContext;

    handleChange(event) {
        this.searchKey = event.target.value;
    }

    @wire(findAccounts, { searchKey: '$searchKey' })
    wiredAccounts({ data, error }) {
        if (data) {
            this.accounts = data;
        } else if (error) {
            this.error = error;
        }
    }

    handleRowAction(event) {
        const row = event.detail.row;
       const payload = {recordId: row.Id};

        publish(this.messageContext, recordSelectedId, payload);

    }
}
Note: We assigned the variable name “recordSelectedId” to retrieve the message using the Messaging Channel. In the handleRowAction function, we utilized the payload to send the message and published the “record Id” as a message variable through Lightning Message Services.
SUBSCRIBER COMPONENT:
Step:5 Creating another Lwc component to show contacts using recordId which we will receive by messaging channel
HTML File Name – accountRecPage.html
<template>
                   <lightning-card title = "Contact Record">
                <div style="height: 300px;">
                  <lightning-datatable key-field="Id" data={contacts.data} columns={columns}                         ></lightning-datatable>
                </div>
               </lightning-card>
    </template>
Step:6 The javascript code to receive the massage
Javascript File Name – accountRecPage.js
We need to import subscribe,unsubscribe,MessageContext } from ‘lightning/messageService’; and recordSelectedId from ‘@salesforce/messageChannel/Counting_Update__c’;
import { LightningElement, track, wire } from 'lwc';

import findContacts from '@salesforce/apex/ContactRelationController.findContacts';
import { subscribe,unsubscribe,MessageContext } from 'lightning/messageService';
import recordSelectedId from '@salesforce/messageChannel/Counting_Update__c';


const columns = [
    { label: 'Id', fieldName: 'Id', type: 'text' },
    { label: 'FirstName', fieldName: 'FirstName', type: 'text'},
    { label: 'LastName', fieldName: 'LastName', type: 'text' },
    { label: 'Email', fieldName: 'Email', type: 'email' },

];

export default class AccountRecPage extends LightningElement {

    @track columns = columns;

    @track recordId;
    subscription =null;

    @wire(MessageContext)
    messageContext;

   connectedCallback(){
    this.subscribeToMessageChannel();

   }

   subscribeToMessageChannel(){
    this.subscription = subscribe(
        this.messageContext,recordSelectedId,
        (message) => this.handleMessage(message)
    );
   }

   handleMessage(message){
    alert("message.recordId "+JSON.stringify(message));
    this.recordId = message.recordId;

    }

    @wire(findContacts, { recordId: '$recordId' })
    contacts;

}
Note: We employed the subscribeToMessageChannel method to obtain the “record Id” as a message from the Lightning Message Channel.
Conclusion
So, here is our strategic guide on establishing communication between two unrelated LWC components using the publish-subscribe model.