Last Updated on July 25, 2023 by Ayub Ansari .
Big Idea or Enduring Question:
- How can a screen flow be integrated into a Lightning Web Component ?
Objectives:
After reading this blog, you’ll be able to:
- Integrate the screen flow into a Lightning Web Component.
- Implement conditional rendering in a Lightning Web Component.
- Utilize uiRecordApi to retrieve record field values without relying on an Apex class.
- and much more !
Business Scenario or Business Case:
Auraan, a Junior Developer at Tenetizer on Cloud (GoC), has been assigned a business requirement to create an LWC component with the following features:
- Display the ‘partnerFlow’ screen flow when the Account Type is ‘Technology Partner’.
- Display the ‘customerFlow’ screen flow when the account type is ‘Customer – Direct’.
- The LWC component should be designed to seamlessly integrate into the account lightning record page.
The approach taken by Sfdcian (I-do):
We will employ the lightning-flow component to incorporate a screen flow within the lightning web component. To achieve this, we need to set the lightning-flow component’s flowApiName attribute to the desired flow’s name. This component includes navigation buttons ( Back, Next, Pause, and Finish ) for users to navigate within the flow.
- getRecord – This method allows you to retrieves record data.
- getRecordCreateDefaults – This method provides default values for new record creation.
- getRecordUi – It fetches layout details for a record, including field display settings.
- createRecord – This method enables you to create a new record.
- deleteRecord – It allows you to delete a record.
- updateRecord – It permits updating an existing record.
To enable the lightning web component for use on a record page in Lightning App Builder, we will configure the XML file with lightning__RecordPage as the target.
Guided Practice (We-do):
To fulfill Auraan’s business requirement using Lightning Web Component and Screen Flow, we need to follow these three steps:
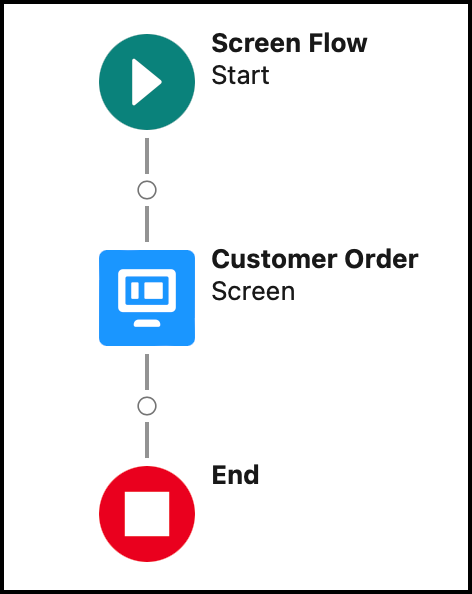
Step 1: Create a ScreenFlow (customerFlow) to handle customer requests.
- Define flow properties for the screen flow.
- Add a Text variable to store the Account Name.
- Add a Screen to display the Account Name from the text variable.
Step 2: Create another ScreenFlow (partnerFlow) to handle partner requests.
- Define flow properties for the screen flow.
- Add a Text variable to store the Account Name.
- Add a Screen to display the Account Name from the text variable.
Step 3: Develop a Lightning web component to display the appropriate Screen Flow based on the account type.
Step 1.1 : Specify Flow Properties (customerFlow)
Additionally, we will utilize the uiRecordApi wire adapter, which enables us to interact with Salesforce records directly from the Lightning Web Component without the need for writing Apex code. This API facilitates various operations, such as retrieving a record’s data or layout details, creating, deleting, updating records, and more. Here are some of the essential methods offered by uiRecordApi:
- Navigate to Setup.
- In the Quick Find box, enter Flows.
- Select Flows from the search results, then click on New Flow.
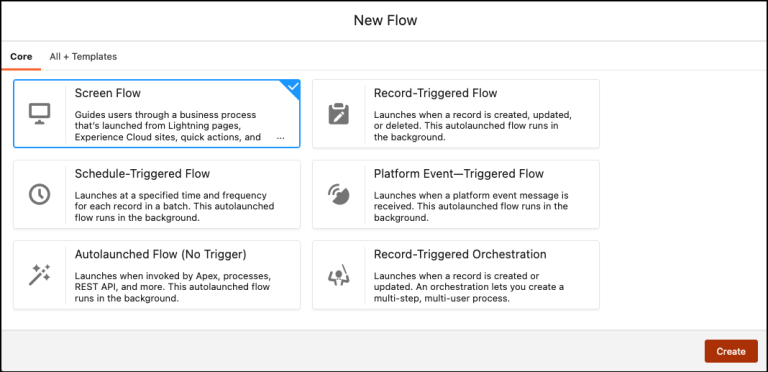
- Choose the Screen Flow option and proceed to Create and Configure the flow.
5.This action will launch the Flow Designer for you.
Step 1.2 : Include a Text Variable to Storing Account Name
- In the Toolbox section, choose Manager, and then click on New Resource to store the account name.
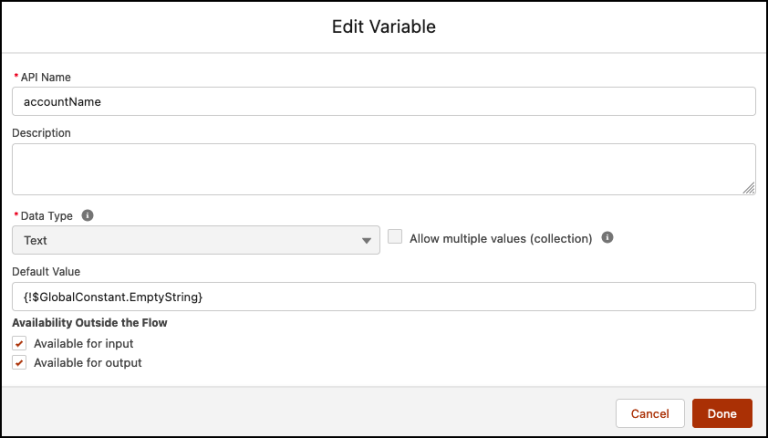
- Input the following details:
- Resource Type: Variable
- API Name: accountName
- Data Type: Text
- Default Value: {!$GlobalConstant.EmptyString}
- Check Available for Input
- Check Available for Output
- Finally, click on the Done button to complete the process.
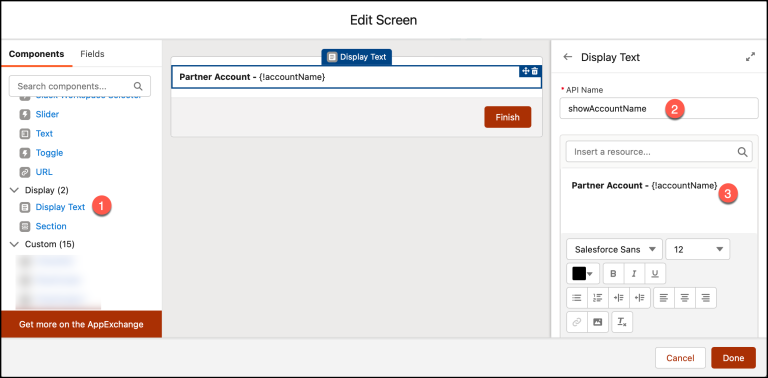
Step 1.3 : Add a Screen to Present the Account Name from the Text Variable
- In the Flow Designer, click on the + icon, and from the options, choose the Screen element.
- Input the following information:
- Enter Label the API Name will auto-populate.
- Click Done.
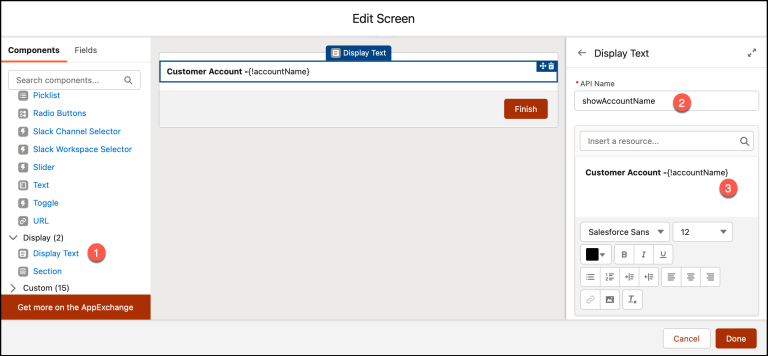
In the end, Auraan’s Flow will look like the following screenshot:
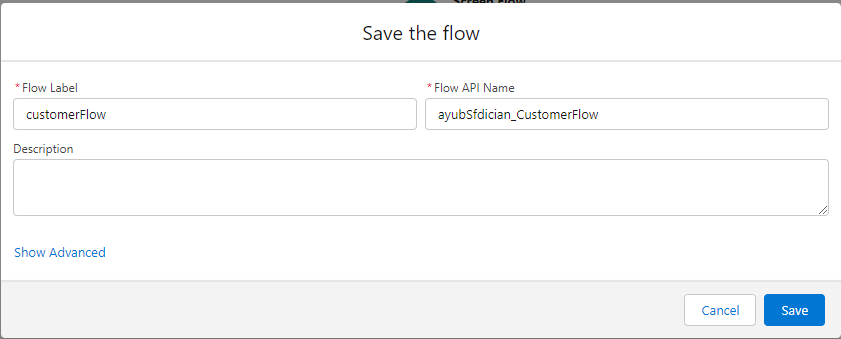
After ensuring that everything is in order, follow these steps:
- Click on the Save button.
- Enter Flow Label the API Name will auto-populate.
- Click on Show Advanced.
- Set the API Version for Running the Flow to “58” or latest version.
- For the Interview Label use customerFlow {!$Flow.CurrentDateTime} to create a unique identifier.
- Click on Save.
Step 2.1 : Specify Flow Properties (partnerFlow)
- Navigate to Setup.
- In the Quick Find box, enter Flows.
- Select Flows from the search results, then click on New Flow.
- Choose the Screen Flow option and proceed to Create and Configure the flow.
5.This action will launch the Flow Designer for you.
Step 2.2 : Include a Text Variable to Storing Account Name
- In the Toolbox section, choose Manager, and then click on New Resource to store the account name.
- Input the following details:
- Resource Type: Variable
- API Name: accountName
- Data Type: Text
- Default Value: {!$GlobalConstant.EmptyString}
- Check Available for Input
- Check Available for Output
- Finally, click on the Done button to complete the process.
Step 2.3 : Add a Screen to Present the Account Name from the Text Variable
- In the Flow Designer, click on the + icon, and from the options, choose the Screen element.
- Input the following information:
- Enter Label the API Name will auto-populate.
- Click Done.
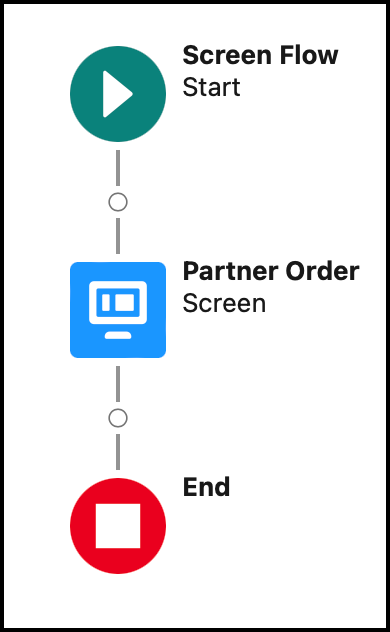
In the end, Auraan’s Flow will look like the following screenshot:
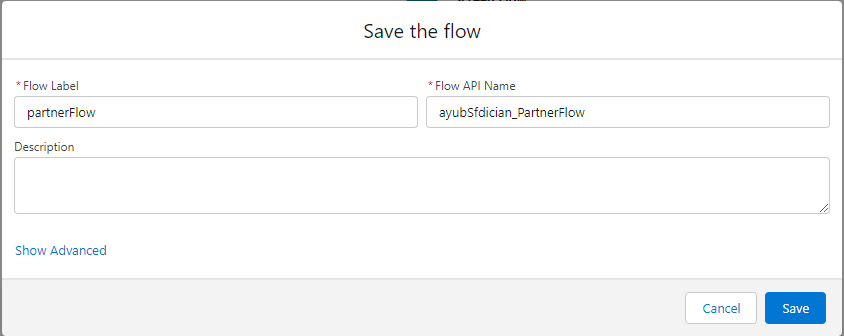
After ensuring that everything is in order, follow these steps:
- Click on the Save button.
- Enter Flow Label the API Name will auto-populate
- Click on Show Advanced.
- Set the API Version for Running the Flow to “58” or latest version.
- For the Interview Label use partnerFlow {!$Flow.CurrentDateTime} to create a unique identifier.
- Click on Save.
Step 3 : Develop a Lightning Web Component to Present Various Screen Flows Depending on the Account Type.
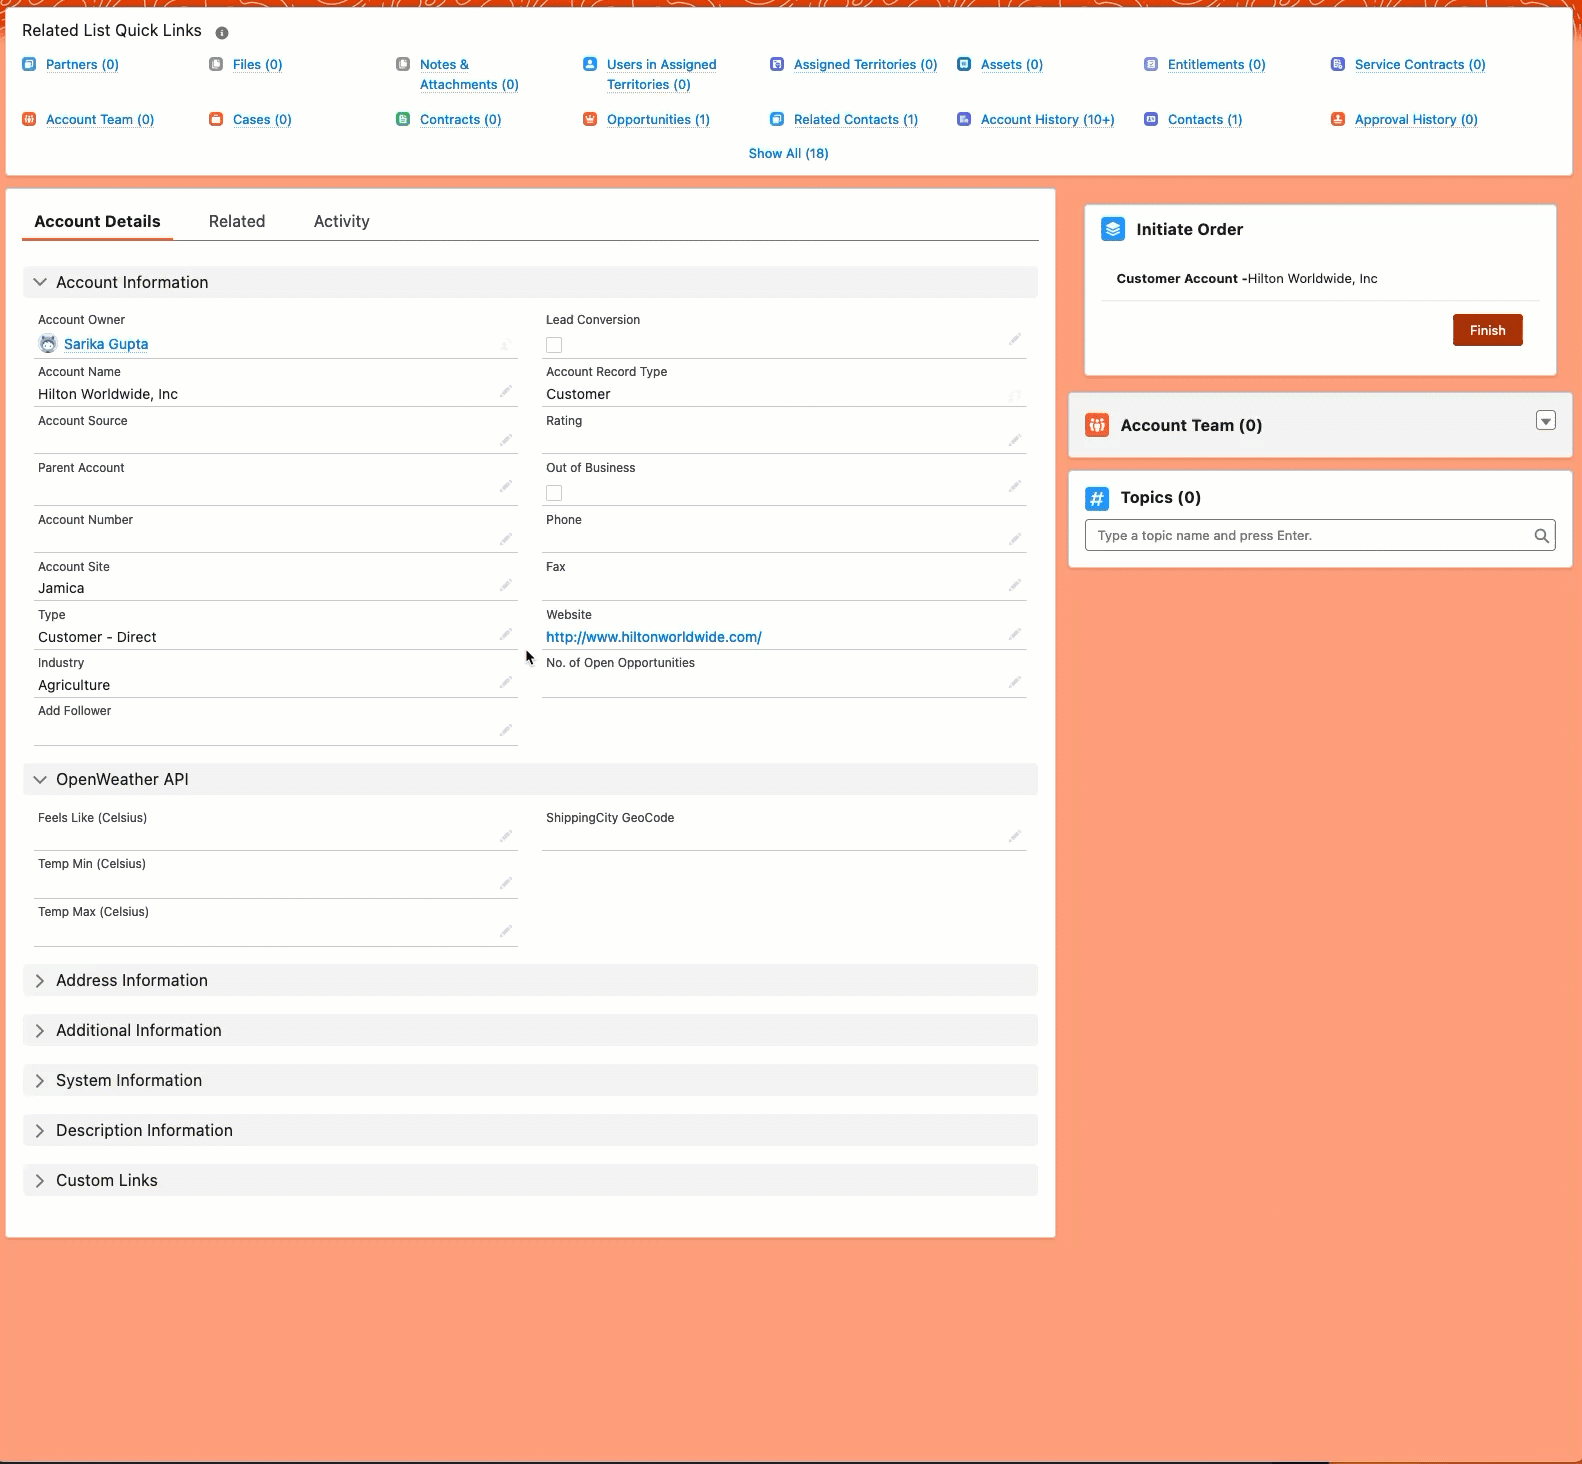
The following Lightning web component template showcases a Lightning card named Initiate Order. Based on the values of the properties isPartner or isCustomer, it will initiate and display the respective Lightning Flow (“ayubSfdician_CustomerFlow” or “ayubSfdician_PartnerFlow”).
integrateFlowToLWC.html
We will use the lightning-flow component to integrate a screen flow within the lightning web component. Let’s analyze the code:
In LWC, the HTML file of every component must be enclosed within a <template> tag. <template if:true={isPartner}> and <template if:true={isCustomer}>: These are conditional templates that display content based on the values of the isPartner and isCustomer properties, respectively. The content within these templates will only be rendered if the corresponding condition evaluates to true.
<template>
    <div class="slds-m-around_medium">
        <lightning-card title="Initiate Order" icon-name="standard:orders">
            <div class="slds-m-around_medium">
                <template if:true={isPartner}>
                    <lightning-flow onstatuschange={handleStatusChange} flow-api-name="ayubSfdician_PartnerFlow" flow-input-variables={inputVariables}></lightning-flow>
                </template>
                <template if:true={isCustomer}>
                    <lightning-flow onstatuschange={handleStatusChange} flow-api-name="ayubSfdician_CustomerFlow" flow-input-variables={inputVariables}></lightning-flow>
                </template>
            </div>
        </lightning-card>
    </div>
</template>
integrateFlowToLWC.js
This JavaScript code sample utilizes the @api decorator to create public properties. For instance, recordId is a public reactive property that stores the ID of the record page. On the other hand, the @wire decorator is used to read Salesforce data. The getRecord function, a part of the lightning/uiRecordApi module, is responsible for fetching a record. The “accountType” and “accountName” are imported from the Salesforce schema.
- The import statements are used to bring in the necessary modules and dependencies. LightningElement serves as the fundamental building block for developing Lightning Web Components.
- The account({ error, data }) function acts as a handler for the response from the getRecord call. In case of an error, it assigns the error to this.error. If data is returned successfully, it sets this.accountName to the account’s name and determines whether isPartner or isCustomer should be set to true based on the account’s type.
- The getter method get inputVariables() returns an array of objects representing input variables for a flow. In this case, it returns the account name.
import { LightningElement, api, wire } from 'lwc';
import { getRecord } from 'lightning/uiRecordApi';
import accountType from '@salesforce/schema/Account.Type';
import accountName from '@salesforce/schema/Account.Name';

export default class integrateFlowToLWC extends LightningElement {
    @api recordId;
    accountName;
    isPartner = false;
    isCustomer = false;

    @wire(getRecord, { recordId: '$recordId', fields: [accountName, accountType] })
    account({ error, data }) {
        if (error) {
            this.error = error;
        } else if (data) {
            this.accountName = data.fields.Name.value;
            if(data.fields.Type.value === 'Technology Partner') {
                this.isPartner = true;
                this.isCustomer = false;
            }
            else if(data.fields.Type.value === 'Customer - Direct') {
                this.isCustomer = true;
                this.isPartner = false;
            }
        }
    }

    get inputVariables() {
        return [
            {
                name: 'accountName',
                type: 'String',
                value: this.accountName
            }
        ];
    }

    handleStatusChange(event) {
        if(event.detail.status === 'FINISHED') {
            //Action after a flow has finished
        }
    }
}
integrateFlowToLWC.js-meta.xml
The isExposed element is set to true, allowing the component to be accessible and usable in tools like the Lightning App Builder or Flow Builder.
The targets element is utilized to define the locations where your component can be employed. In this case, the lightning__RecordPage tag indicates that this component is designed to be utilized on a record page within the Lightning App Builder.
<?xml version=”1.0″ encoding=”UTF-8″?>
<LightningComponentBundle xmlns=”http://soap.sforce.com/2006/04/metadata”>
<apiVersion>58.0</apiVersion>
<isExposed>true</isExposed>
<targets>
<target>lightning__RecordPage</target>
</targets>
</LightningComponentBundle>
Proof Of Concept