Introduction to Lightning Web Components LWC
Lightning Web Components (LWC) represent the latest programming model aimed at fostering a new generation of Lightning Components. Diverging from Aura, LWC aims to harness the capabilities of modern, feature-rich browsers while retaining the capacity to craft lightweight, yet robust components and applications. LWC components coexist harmoniously with Aura components and make use of identical foundational services, like Lightning Data Service, ensuring effortless integration.
Developers tasked with creating custom Lightning Components shoulder the responsibility of comprehensive regression, unit, and functional testing. Prior to LWC, a definitive method for front-end unit testing of Lightning Components was elusive… until Jest entered the scene.
Introduction to Jest
When considering component testing, it’s crucial to distinguish between two types: functional and unit testing. Salesforce.com’s documentation briefly mentions that while functional (end-to-end) testing isn’t recommended for Lightning Web Components, they strongly advocate for Jest unit testing. Jest, a JavaScript testing framework, prioritizes simplicity. These tests are run locally and aren’t deployed to Salesforce.com as part of the component bundle. Each test resides in a separate folder within the component bundle and contains multiple tests within test suites.
Lightning Web Components offer extensive pre-built functionalities, expediting development and averting redundancy. A prime example is the platformShowToastEvent module that can be imported into any component. This module introduces a JS class, ShowToastEvent, enabling the dispatch of customizable toast messages within your component. Once this module is implemented, it’s inevitable that you’ll need to craft a front-end Jest unit test to ensure proper firing of these events in specific scenarios. Let’s explore the optimal approach for validating event firing when writing Jest unit tests.
At long last, here’s some code to delve into…
Here’s a basic component called “toastExample” that we’ll use to showcase functionality and create a unit test to confirm the firing of toasts. Within toastExample.html, you’ll find a lone <lightning-button> component featuring an onclick handler attribute, triggering our showToast function.
<template>
    <lightning-button
        label="Show Toast"
        onclick={showToast}>
    </lightning-button>
</template>
Within our JavaScript controller, toastExample.js, we have two import statements. One imports the base LightningElement from the lwc module, while the other brings in ShowToastEvent from lightning/platformShowToastEvent, enabling us to trigger toast notifications. Inside the showToast() function, we create a new ShowToastEvent instance and provide an object with title and message attributes. Subsequently, we use dispatchEvent with our event as a parameter, resulting in the display of our toast notification. Now, let’s explore the Jest unit test essential for testing the toastExample component.
import { LightningElement } from 'lwc';
import { ShowToastEvent } from 'lightning/platformShowToastEvent'

export default class MyComponent extends LightningElement {
    showToast() {
        const event = new ShowToastEvent({
            title: 'Toast Title',
            message: 'Here is our toast message',
        });
        this.dispatchEvent(event);
    }
}
Here’s our Jest unit test, named toastExample.test.js. Initially, we import createElement from the lwc module and the component we intend to test, in this case, ToastExample from c/toastExample. As per Salesforce documentation, we’re advised to import ShowToastEventName from lightning/platformShowToastEvent, a step aiding us in testing ShowToastEvent. For now, let’s disregard this and the commented constant below it.
Moving forward, we start defining our test suite using describe(‘c-toast-example’, () => {}). All our tests will reside within the anonymous function passed as the second parameter, and they can either have their own describe functions or be directly under the main describe function. For our straightforward scenario, we’ll keep our single test directly under the main describe function.
Continuing, we establish our test using the test function (which can also be replaced by is()). This function creates an element for the component we’re testing and appends it into the document body. At this point, we’ve set the groundwork to construct our testing scenario.
Let’s recap our objective here. We aim to validate that the toast fires upon clicking our button, so we need to listen to the event triggering the toast display. You might ask, “What’s the name of that event?” As per the documentation, this event can be imported as ShowToastEventName (which we’ve done previously).
Our next step involves defining a mock function and assigning it to our constant:
const showToastHandler = jest.fn();
The function showToastHandler, acting as a callback, will be employed as an event listener on ToastExampleElement. It’ll listen specifically for the ShowToastEventName, and this is the way we set it up:
ToastExampleElement.addEventListener(
    ShowToastEventName,
    showToastHandler
);
import { createElement } from 'lwc';
import ToastExample from 'c/toastExample';

import { ShowToastEventName } from 'lightning/platformShowToastEvent';
//const SHOW_TOAST_EVT = 'lightning__showtoast';

describe('c-toast-example', () => {

    afterEach(() => {
        while (document.body.firstChild) {
            document.body.removeChild(document.body.firstChild);
        }
        jest.clearAllMocks();
    });

    test('the ShowToastEvent is fired when the user clicks the button', () => {
        const ToastExampleElement = createElement('c-toast-example', {
            is: ToastExample
        });
        document.body.appendChild(ToastExampleElement);

        const showToastHandler = jest.fn();
        ToastExampleElement.addEventListener(ShowToastEventName, showToastHandler);
        //ToastExampleElement.addEventListener(SHOW_TOAST_EVT, showToastHandler);

        return Promise.resolve().then(() => {
            const showToastBtn = ToastExampleElement.shadowRoot.querySelector('lightning-button');
            showToastBtn.click();

        }).then(()=> {
            expect(showToastHandler).toBeCalledTimes(1);
        });
    });
});
We anticipate that upon clicking the button, the ShowToastEventName event will trigger. As our ToastExampleElement component is attuned to this event, it would invoke its jest mock callback function, showToastHandler.
After our promise is resolved, we locate our button and invoke the click function. It’s crucial to await the resolution of our promise. Once it resolves, we formulate our assertion within the subsequent chained then statement.
expect(showToastHandler).toBeCalledTimes(1);
Let’s execute our test suite and verify if it passes.
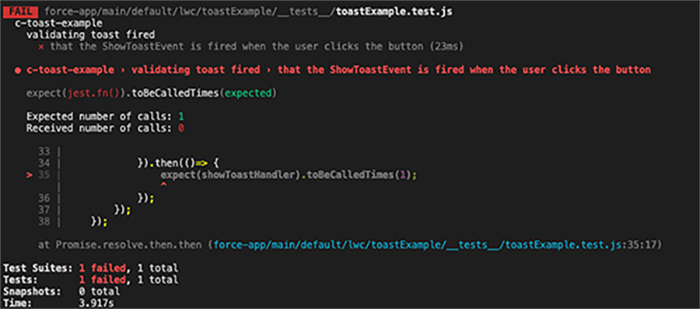
It seems that our expect function has failed, indicating that the mock function wasn’t invoked, signifying that the event we were monitoring didn’t trigger. Instead, let’s define the event name manually and reference it as demonstrated below:
const SHOW_TOAST_EVT = ‘lightning__showtoast’;
Additionally, we must modify our event listener from ShowToastEventName to our manually defined constant SHOW_TOAST_EVT by removing the comment marker from the line below.
ToastExampleElement.addEventListener(SHOW_TOAST_EVT, showToastHandler);
Following our second attempt, here is the outcome:
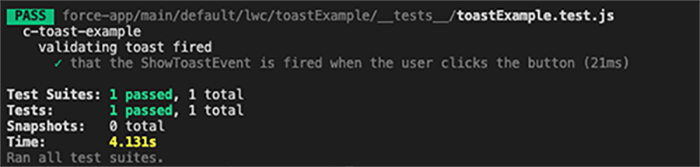
Success! We discovered that when a toast is fired, its event name is lightning__showtoast, but exporting ShowToastEventName from platformShowToastEvent.js will yield undefined. By monitoring this event, we can effectively track when toasts are being triggered.
Having used Jest for several months, I’ve found it incredibly enjoyable and a valuable asset alongside LWC. There’s invariably a learning curve with a new framework, yet I hope my insights above can streamline someone else’s journey as they delve into learning LWC and Jest!