
We’ve reviewed several blog entries regarding SFDX and its functionalities before. In this post, I’ll outline the process of utilizing SFDX with Developer, Sandbox, or Production Orgs. Essentially, we’ll cover the utilization of SFDX with non-Scratch Orgs. Our tool of choice will be the official Salesforce IDE for SFDX, namely VSCode.
Assuming you’ve already installed the VSCode extension within your VSCode environment.
1. Generate an SFDX project within VSCode.
Launch VSCode and press cmd+Shift+p. This will prompt various options; choose “SFDX: Create Project.”
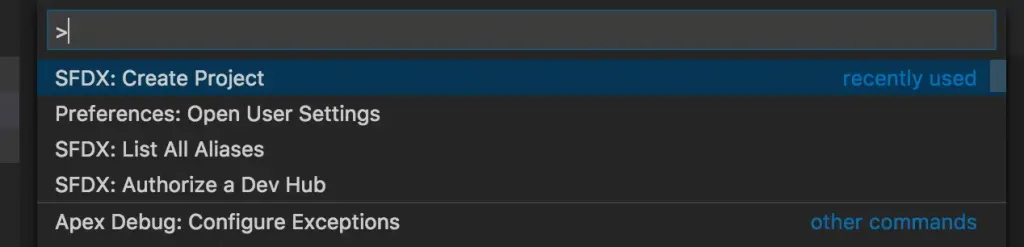
Initiate the creation of an SFDX project.
The following screen will prompt for the project name and the preferred location for saving it.

Name of the SFDX project
It’s time to familiarize yourself with fundamental SFDX commands. Refer to this post for a crash course on SFDX.
Leveraging SFDX with Sandboxes
To employ SFDX with a Sandbox, access the file sfdx-project.json in VSCode and modify the sfdcLoginUrl to specify the Sandbox URL.https://test.salesforce.comAlternatively, input your domain URL if Single Sign-On (SSO) is configured.
2. Establish Authentication for Developer Account using SFDX

Execute an SFDX command within VSCode.
Before authenticating a new organization, it’s advisable to verify its authentication status by using the following command:
sfdx force:org:list
If authentication hasn’t been established, execute this command to authenticate with the Salesforce developer org.
sfdx force:auth:web:login --setdefaultdevhubusername --setalias my-devhub-org
3. Generate package.xml
Here’s a sample package.xml including a Lightning Component and a Flow.
<?xml version="1.0" encoding="UTF-8"?>
<Package xmlns="http://soap.sforce.com/2006/04/metadata">
    <types>
        <members>Lookup</members>
        <name>AuraDefinitionBundle</name>
    </types>
    <types>
        <members>LexComponentLookupDemo-1</members>
        <name>Flow</name>
    </types>
     <types>
     <members>LexComponentLookupDemo</members>
     <name>FlowDefinition</name>
  </types>
    <version>42.0</version>
</Package>
4. Fetch Metadata
I’ve established a metadata folder within my project, housing the package.xml file. Running the command below retrieves a zipped file containing the metadata.
sfdx force:mdapi:retrieve -r metadata -u jit11 -k metadata/package.xml
- -u : Which Salesforce Org to be used by Salesforce DX
- -r : Where zip file should be saved
- -k : List of components to be retrieved using package.xml
The issue with the previous command is that it provides a zip file, necessitating unzipping each time. To streamline the process and save time, I’ve created a command/batch file that not only retrieves metadata but also unzips it simultaneously. Below is the content of the file used to unzip the metadata.
echo "Retrieve Metadata from Sandbox"
echo "Command - sfdx force:mdapi:retrieve -r metadata -u jit11 -k metadata/package.xml"
sfdx force:mdapi:retrieve -r metadata -u jit11 -k metadata/package.xml
echo "Unzip results"
echo "Command - unzip -o metadata/unpackaged.zip -d metadata"
unzip -o metadata/unpackaged.zip -d metadata
rm metadata/unpackaged.zip
Executing the aforementioned file is simple on a Windows operating system. However, on a Mac, it’s necessary to inform the OS that the metadata_r.command file is an executable file by using the following command. Please ensure to execute this command from Terminal and not from VSCode.
chmod +x mdapi_r.command
The command/batch file can be executed on a Mac by using:
bash filename
5. Implement Metadata
The following command is applicable for deploying components in non-scratch Salesforce instances.
sfdx force:mdapi:deploy -c -f ../mdAPIZip/unpackaged.zip -u jit11 -w 10
or
sfdx force:mdapi:deploy -c -d ../mdAPIZip/unpackaged -u jit11 -w 10
In situations where…
- -u : Which Salesforce Org to be used by Salesforce DX
- -f : Zip file location containing metadata and package.xml
- -c : Check only flag, Package would be validates only
- -w : Wait time in minute for operation to be completed
- -d : Folder location of non-zipped files, with package.xml in root
To know more about how to deploy to Developer, Sandbox or Production org (non scratch Org) using SFDX, refer this post.