
A Jira issue refers to a specific task, defect, or piece of work within a Jira project. Users or teams create Jira issues to document bug fixes, new features, enhancements, or tasks. These issues are typically generated within the Jira project itself. This guide will provide detailed instructions on integrating Jira into Salesforce Apex and how to create a Jira issue directly from Salesforce.
Jira is widely used as a project management tool.
Use Case for Jira Integration in Apex
Create a Jira issue from the Case record when the button ‘Create Jira Issue’ is clicked. Get the issue id after creation and put that in the Jira ID
Solution
To create a Jira issue in Salesforce, we will use the Jira REST API. We can integrate Jira REST API using Apex and Salesforce Flow. For this post, we will use Salesforce Apex to integrate Jira.
We will create a Custom Metadata type for storing Jira information like project, issue type and due date. This information will be used to integrate and create issues in specific projects. We will also add one field JiraId in the Case object to update the generated Jira Id. This Jira id can be used later for retrieval for reporting purposes.
Implementation
To implement this we have to follow these steps
- Create Named and External Credential
- Create custom metadata type
- Create Apex Classes for Jira Integration
- Create an Apex Invocable class
- Create a flow to call the apex method from the Button
- Create a button to call Flow
- Test Functionality
Let us handle each step to complete integration with Jira.
1. Establish Named and External Credentials
To establish a secure connection between Salesforce and Jira, we will need a named credential. Follow steps 1 to 5 outlined in the blog post titled “Verify API Connection in Flow HTTP Callout” to create a named credential, external credential, named principal, and permission set. Ensure to assign the permission set to your user or the required user. Assigning a permission set is crucial for the user, as without it, the integration process cannot be completed.
For this tutorial, the API URL is https://tenetizer.atlassian.net/rest/api/3/issue/. However, please note that your API URL may differ, so be sure to verify it with your Jira project.
2. Create custom metadata type
Create a custom metadata type Jira Configuration (JiraConfig__mdt) to store Jira project information. Create below metadata fields
| Field Label | Field API | Data Type |
|---|---|---|
| Due Date | DueDate__c | Number(2, 0) |
| Issue Type Id | IssueTypeId__c | Text(20) |
| Project Key | ProjectKey__c | Text(20) |
Metadata Types Fields
Add the below record in this metadata object.
| Label | Jira Config Name | Due Date | Project Key | Issue Type Id |
|---|---|---|---|---|
| PRJ1 | PRJ1 | 7 | SFDCTEAM | 10004 |
If you have multiple projects, you can add all of them and use them in Apex accordingly. This information will be different for you, so add information accordingly.
3. Create Apex Class for Jira Integration
Create below apex classes for integrating Jira.
- BaseException – Common exception class.
- Jira – It is a data transformation class.
- JiraResponse – It is a callout response wrapper class.
- JiraService – This class holds code for the Jira API Integration.
- JiraTaskController – It is a controller class to call JiraService apex. It will get metadata information and current record information to use in Jira issue creation.
public class BaseException extends Exception {

}
public class Jira {
    public string ProjectKey{get;set;}
    public string IssueTypeId{get;set;}
    public string TaskDescription{get;set;}
    public string TaskSummary{get;set;}
    public string DueDate{get;set;}
}
public class JiraResponse{
	public String id;	//10004
	public String key;	//SFDCTEAM-5
	public String self;	//https://salesforcecodex.atlassian.net/rest/api/3/issue/10004
	public static JiraResponse parse(String json){
		return (JiraResponse) System.JSON.deserialize(json, JiraResponse.class);
	}
}
public class JiraService {
	public static JiraResponse createJiraTicket(Jira jira)
    {
       	//Request Body Sample
        /*
        {
            "fields":
            {
                "project":
                {
                    "key":"SFDCTEAM"
                },
                "summary":"Issue1 from PostMan",
                "issuetype":{
                    "id":"10004"
                },
                "duedate":"2024-05-15",
                "description": {
                    "content": [
                        {
                        "content": [
                            {
                            "text": "Order entry fails when selecting supplier.",
                            "type": "text"
                            }
                        ],
                        "type": "paragraph"
                        }
                    ],
                    "type": "doc",
                    "version": 1
                    }
            }
        }*/

        string REQUEST_BODY='{"fields":{"project":{"key":"PKEY"},"summary":"SUMRY","issuetype":{"id":"ISTYPE"},"duedate":"DDATE","description":{"content":[{"content":[{"text":"TDESC","type":"text"}],"type":"paragraph"}],"type":"doc","version":1}}}';

        HttpRequest request=new HttpRequest();
        HttpResponse response=new HttpResponse();
        Http httpRootObj = new Http();
        //Authentication token is added in Named Credential
        request.setEndpoint('callout:JiraNC/rest/api/3/issue/');
        request.setHeader('Content-Type','application/json');
        request.setHeader('Accept','application/json');
        request.setMethod('POST');
       	REQUEST_BODY=REQUEST_BODY.replace('PKEY',jira.ProjectKey)
            .replace('SUMRY',jira.TaskSummary)
            .replace('ISTYPE',jira.IssueTypeId)
        	.replace('DDATE',jira.DueDate)
            .replace('TDESC',jira.TaskDescription);
        system.debug(REQUEST_BODY);

        request.setBody(REQUEST_BODY);
        request.setTimeout(60000);
        try
        {
            response= httpRootObj.send(request);
            system.debug(response.getBody());
            return JiraResponse.parse(response.getBody());
        }
        catch(Exception expObj)
        {
            throw new BaseException(expObj);
        }
    }
}
public class JiraTaskController {

    public static void createJiraTask(string recordId){

        List<JiraConfig__mdt> configs=[Select DueDate__c,IssueTypeId__c,ProjectKey__c from JiraConfig__mdt where DeveloperName='PRJ1'];
        if(configs.size()>0)
        {
            List<Case> cases=[Select Subject,Description,JiraId__c from Case where Id=:recordId];
            if(cases.size()>0){
                Jira jira=new Jira();
                jira.TaskSummary=cases[0].Description;
                jira.TaskDescription=cases[0].Subject;
                jira.DueDate=System.now().addDays(Integer.valueOf(configs[0].DueDate__c)).format('yyyy-MM-dd');
                jira.IssueTypeId=configs[0].IssueTypeId__c;
                jira.ProjectKey=configs[0].ProjectKey__c;
                system.debug('jira:'+JSON.serializepretty(jira));
                JiraResponse respo=JiraService.createJiraTicket(jira);
                cases[0].JiraId__c=respo.id;
                //Update current Case
                update cases[0];
            }
        }
    }
}
Based on the above classes it will return the below JSON response which will be deserialzed using JiraResponse class.
{
    "id": "10005",
    "key": "SFDCTEAM-6",
    "self": "https://salesforcecodex.atlassian.net/rest/api/3/issue/10005"
}
4. Create an Apex Invocable class
As we need to create the Jira Issue on the button click, we have to call the above classes from the button. We can not call the apex class directly from the button, we need to call this class from the Lightning component or Screen flow. We will use screen flow for this purpose.
To use the apex class in flow, we need to create an invocable apex class. Create the below apex that will be called from the screen flow. Method createIssue will call JiraTaskController to create an issue based on the passed parameter from the flow.
public class JiraServiceInvocable {
    @InvocableMethod(Label='Create Jira Issue' Description='Create Jira Issue')
    public static List<boolean> createIssue(List<string> recordIds) {
        Boolean isSuccess=JiraTaskController.createJiraTask(recordIds[0]);
        return new List<boolean>{isSuccess};
    }
}
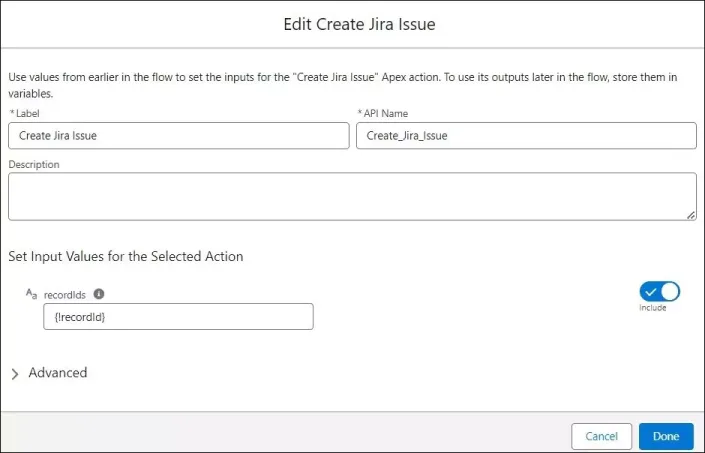
5. Create a Screen Flow to Invocable Method
Create a screen flow Jira Issue Creation and add action on it. On action select above created Invocable Method Create Jira Issue. This action requires a current record id for method execution so create a text variable with the API name recordId. The variable should be marked checked for Available for input.
6. Create an action button on the object
Create an action button to create Jira issue on the case object. This button will call the above-created screen flow.
| Label | Create Jira Issue |
| Action Type | Flow |
| Flow | Jira Issue Creation |
| Standard Label Type | –None– |
| Name | Create_Jira_Issue |

Create an Action Button on the Salesforce Object
7. Add a Button to the Page Layout
Add the above-created action button to the page layout. This button will call flow to execute API Integration.

Add Button to Salesforce Page Layout